
Installation Options
Getting up and running with Swift Sensors is designed to be fast, flexible, and frustration-free. Whether you’re a small business handling setup on your own or a large enterprise with complex deployment requirements, we have an installation path that fits your needs.
Self-Installation
The vast majority of Swift Sensors customers install the system internally with minimal IT support required. Our wireless sensors are compact and unobtrusive, designed to be placed virtually anywhere without cabling or permanent modifications. Because everything communicates wirelessly, you can easily reposition or add sensors any time your needs change.
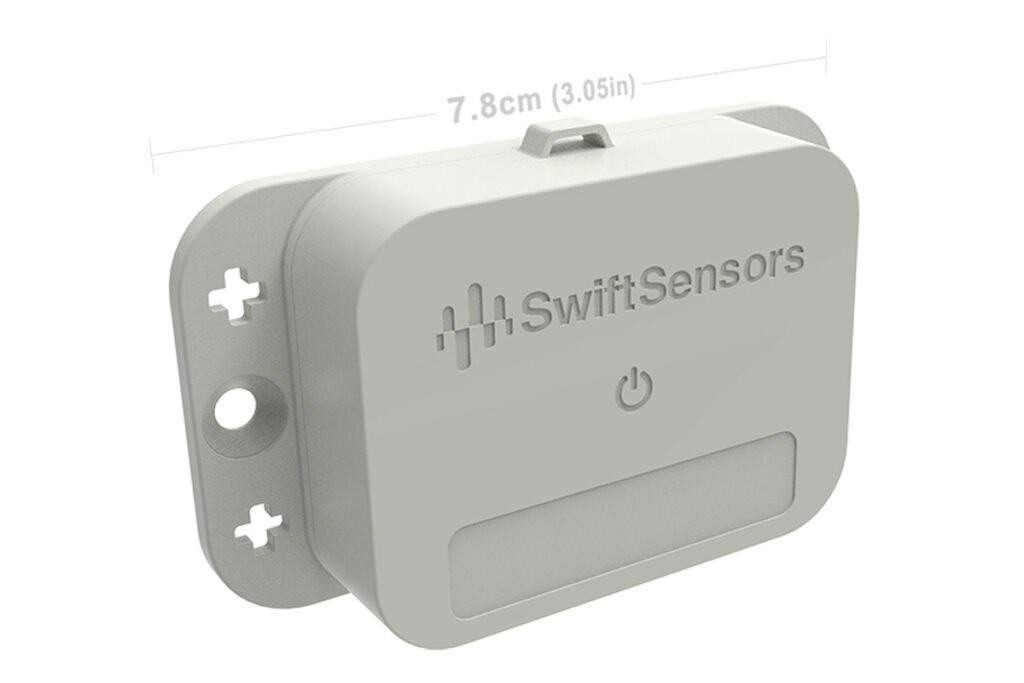
Wireless Sensors
Swift Sensors wireless sensors are small, battery-powered, and ready to deploy straight out of the box. Activating a sensor is as simple as pressing a button — it connects to your gateway automatically. Place sensors on shelves, inside equipment, in refrigerators, on walls, or anywhere you need to monitor.
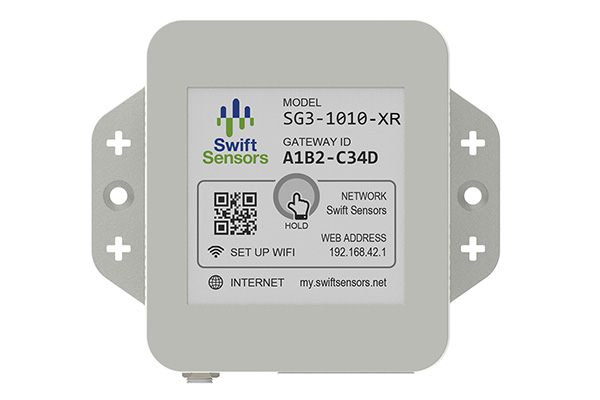
Cloud Connection
The Swift Sensors gateway is your connection to the cloud, and getting it online takes just minutes. Choose the connectivity option that works best for your facility:- WiFI: A simple guided setup from your smartphone connects the gateway to your existing wireless network in minutes.
- Ethernet: Plug in and you’re online in about two minutes.
- Cellular: Attach the cellular module to the gateway’s USB port and connectivity is automatic. No network infrastructure required.
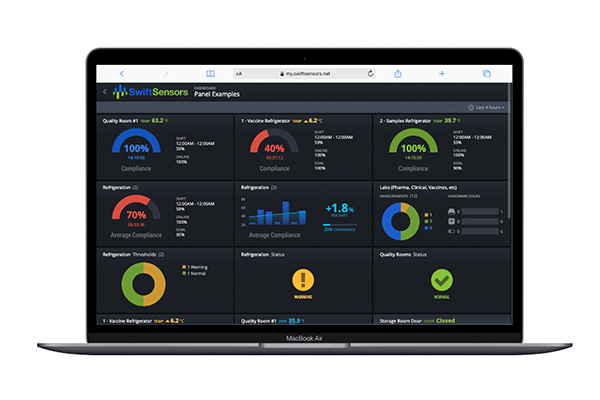
Account Set-Up
The Swift Sensors Cloud Console is your command center for monitoring, alerts, and data. Creating a new account takes just a few clicks: fill out a simple form, verify your email, and you’re in. Registering your gateway to your account is equally straightforward and takes less than a minute. Once your sensors are online, naming and organizing them is intuitive. Label each sensor by location or function, set thresholds for alerts, and configure notifications by email, SMS, or voice call. The entire process — from unboxing to live monitoring — typically takes less than 30 minutes.Getting Started Guide
The Swift Sensors Getting Started Guide walks users through the complete process of setting up a cloud-based wireless sensor system. The guide covers how to create an account in the Swift Sensors Console, connect the gateway to the cloud, activate sensors, set alert thresholds, and set up notifications.
Certified Installer Network
For enterprise deployments with complex requirements, Swift Sensors works with a national network of certified installation professionals. Our certified installers are trained and experienced with Swift Sensors systems and can handle large-scale or technically demanding deployments with confidence, ensuring your system is optimally planned, installed, and configured from day one.
If your organization requires custom sensor placement planning, multi-site rollouts, or deployment in challenging environments, our certified installer network delivers the expert support you need.
Planning Your Deployment
A little upfront planning goes a long way toward a smooth installation and a system that performs exactly as expected. Here are the key factors to consider before you order.
Count Your Devices and Define Measurements
Start by identifying every asset, space, or piece of equipment you want to monitor. Make a list of each device-type and location. Determine what type of measurements you need — temperature, humidity, door/window status, water detection, voltage, and so on. This inventory will drive how many sensors you need and which sensor models are appropriate for each application.
Determine How Many Gateways You Need
Each Swift Sensors gateway supports up to 150 sensors and communicates with them using Bluetooth Low Energy 5 (BLE5). Under ideal open-air conditions, sensors can connect from up to 300 feet (approximately 90 meters) away. In real-world indoor environments, effective range will vary based on the layout and construction of your space.
When planning gateway placement, consider the following factors that can reduce BLE5 signal range:
- Building materials: Concrete and cinder block walls, brick, and reinforced steel structures cause significant signal attenuation. Thick masonry can reduce effective range by 50% or more. Standard drywall, wood-framed walls, and glass have a much smaller impact.
- Metal structures and equipment: Metal reflects and absorbs BLE signals rather than allowing them to pass through. Large metal shelving units, server racks, stainless steel equipment, walk-in coolers, industrial machinery, and metal partitions or filing cabinets can all create dead zones if sensors are placed directly behind them relative to the gateway.
- Refrigeration and cold storage: Walk-in coolers and freezers with insulated metal doors and walls can significantly attenuate signals. Sensors inside refrigerated units may require closer gateway placement.
- Water and humidity: Water absorbs radio frequency energy. Environments with high moisture content, large water storage tanks, aquariums, or industrial wash-down areas may experience reduced range.
- RF interference: BLE5 operates in the 2.4 GHz band, which is shared with Wi-Fi, microwave ovens, and other wireless devices. Dense wireless environments — such as data centers, manufacturing floors, or busy office buildings — may require gateway placement optimization.
- Dense furniture and fixtures: Large wood or metal furniture, high-density shelving stacked with products, and ceiling fixtures can create obstructions that reduce signal strength in localized areas.
Multi-Floor Buildings
BLE5 signals do not reliably penetrate between floors, particularly in buildings with concrete floor-ceiling assemblies, steel decking, or significant mechanical/HVAC infrastructure in the plenum space. As a general rule, each floor of a building will require its own gateway or set of gateways, depending on the floor’s square footage and layout. Factor the number of floors in your facility into your gateway count when planning your order.Large or Complex Deployments
For larger facilities or deployments with unusual layouts, it is helpful to prepare a simple schematic or floor plan of the spaces to be monitored, with proposed sensor locations marked and any known obstructions noted. Sharing this with our team allows us to help you determine the optimal number and placement of gateways before you order. Our customer account executives are always available to review your requirements and help you size your deployment with confidence. Whether you have a single location with a handful of sensors or a multi-site enterprise rollout, we’re happy to work through the details with you.Questions About Calibration?
Not sure what’s right for your application? Talk to your Swift Sensors account executive. We’ll help you build a calibration schedule that keeps you compliant and confident.